I love Christmas time! I love all the pretty, sparkly ornaments, the colors and decorations one sees around and don't forget the lights!
And so it is also time to make Christmas cards to let people know that we love them and think of them. Although I did make a few cards that were all the same, for the most part I like to make cards specifically for individuals. Here are two of them:
Both images were printed on Strathmore Paint Pad paper and then colored with my Prismacolor pencils. I got the lineart for both images from Buddly Crafts.
I cut the images out with my Gina Marie designs dies, the stitched oval dies for the teddy bear and the red glitter cardstock and the lace oval dies for the candles.
The green and the white card panels were embossed with a Darice snowflake embossing folder. The Merry Christmas sentiment is a retired Stampin Up stamp.
Stay tuned for more Christmas card posts.
General supplies:
Strathmore Paint Pad paper
Reflections 110lb heavyweight carstock for card base
Green and white cardstock
Red glitter cardstock.
Gina Marie Designs stitched oval dies
Gina Marie lace oval dies
Cardstock offcuts for frame and ledge
Little Teddy Bear's Christmas Gifts digital stamp
Christmas Candles digital stamp
Sentiment stamp
Prismacolor pencils
Wednesday, November 29, 2017
Sunday, November 26, 2017
Finally some coloring again
Life has been hectic and while I have colored some between, I have not been able to actually complete a project. But here we are.
The line art of this beautiful flower image is by Conie Fong. I colored it with my Prismacolor pencils on sand colored Canson Mi Tientes paper. It was the second time I had tried the Mi Tientes paper and I found it rather difficult to accomplish my pencil to pencil blending that I am used to doing. I did need the blender pencil to achieve the smooth look that I usually get on the Strathmore Paint Pad paper. Though I do love the color tone of the sand paper, making the pencil colors pop off the page.
To complete the little scene, I used brick pattern paper for my card panel and then added the image with a frame created using Gina Marie designs nested stitched rectangle dies. I also added a small strip of cardstock to replicate a window ledge.
Lastly I stamped the sentiment of a small precut tag and finished it off with a bow tied with twine.
General supplies:
Sand colored Canson Mi-Teintes
Reflections 110lb heavyweight carstock for card base
Patterned paper
Gina Marie Designs stitched rectangle dies
Cardstock offcuts for frame and ledge
Flowers In A Vase digital stamp
Precut tag
Sentiment stamp
Brown and white twine
Prismacolor pencils
The line art of this beautiful flower image is by Conie Fong. I colored it with my Prismacolor pencils on sand colored Canson Mi Tientes paper. It was the second time I had tried the Mi Tientes paper and I found it rather difficult to accomplish my pencil to pencil blending that I am used to doing. I did need the blender pencil to achieve the smooth look that I usually get on the Strathmore Paint Pad paper. Though I do love the color tone of the sand paper, making the pencil colors pop off the page.
To complete the little scene, I used brick pattern paper for my card panel and then added the image with a frame created using Gina Marie designs nested stitched rectangle dies. I also added a small strip of cardstock to replicate a window ledge.
Lastly I stamped the sentiment of a small precut tag and finished it off with a bow tied with twine.
General supplies:
Sand colored Canson Mi-Teintes
Reflections 110lb heavyweight carstock for card base
Patterned paper
Gina Marie Designs stitched rectangle dies
Cardstock offcuts for frame and ledge
Flowers In A Vase digital stamp
Precut tag
Sentiment stamp
Brown and white twine
Prismacolor pencils
Wednesday, July 19, 2017
A little Christmas in July
I am very excited to tell you that my grayscale coloring that I did last month won me a prize. I received another Conie Fong image.
This month the challenge in the Conie Fong Art & Design Group is Christmas in July. Looking at the two images I have of Bella, namely Bella sending you smiles and Bella with Gift, I could just see how they could represent Christmas and July respectively.
Recently while at my local craft store, I bought a sheet of Sand colored Canson Mi-Teintes. I printed the images on this kraft colored paper and colored them accordingly. I had printed them out through my Silhouette Studio software and when I came to cut them out, I made an interesting discovery. The Silhouette cannot read the registration marks on non-white paper.
So what now? Fortunately hubby came to the rescue. He suggested printing the page out again on white paper, placing this page over the dark sheet and allowing the machine to read those registration marks. Then pause the machine after registration mark reading, but before cutting and remove the white page. It worked! Needs a bit more refinement in technique, but it worked. I will work on this some more because pencil works so well on kraft colored paper and I definitely will be using it some more.
I drew patterned paper shapes to mat the cutout bears on and sponged the edges with Memento ink. The sentiment was cut out of black cardstock on my Silhouette machine. I discovered Honey Script font and love it for sentiments. The red heart is popped up on a foam strip to give it some dimension.
All the elements were mounted on a 5x7 white glitter cardstock panel which was in turn added to a white card base.
General supplies:
Sand colored Canson Mi-Teintes
Reflections 110lb heavyweight carstock for card base
Black cardstock for the sentiment
White glitter cardstock
Patterned paper
Bella sending you smiles digital stamp
Bella with Gift digital stamp
Prismacolor pencils
This month the challenge in the Conie Fong Art & Design Group is Christmas in July. Looking at the two images I have of Bella, namely Bella sending you smiles and Bella with Gift, I could just see how they could represent Christmas and July respectively.
Recently while at my local craft store, I bought a sheet of Sand colored Canson Mi-Teintes. I printed the images on this kraft colored paper and colored them accordingly. I had printed them out through my Silhouette Studio software and when I came to cut them out, I made an interesting discovery. The Silhouette cannot read the registration marks on non-white paper.
So what now? Fortunately hubby came to the rescue. He suggested printing the page out again on white paper, placing this page over the dark sheet and allowing the machine to read those registration marks. Then pause the machine after registration mark reading, but before cutting and remove the white page. It worked! Needs a bit more refinement in technique, but it worked. I will work on this some more because pencil works so well on kraft colored paper and I definitely will be using it some more.
I drew patterned paper shapes to mat the cutout bears on and sponged the edges with Memento ink. The sentiment was cut out of black cardstock on my Silhouette machine. I discovered Honey Script font and love it for sentiments. The red heart is popped up on a foam strip to give it some dimension.
All the elements were mounted on a 5x7 white glitter cardstock panel which was in turn added to a white card base.
General supplies:
Sand colored Canson Mi-Teintes
Reflections 110lb heavyweight carstock for card base
Black cardstock for the sentiment
White glitter cardstock
Patterned paper
Bella sending you smiles digital stamp
Bella with Gift digital stamp
Prismacolor pencils
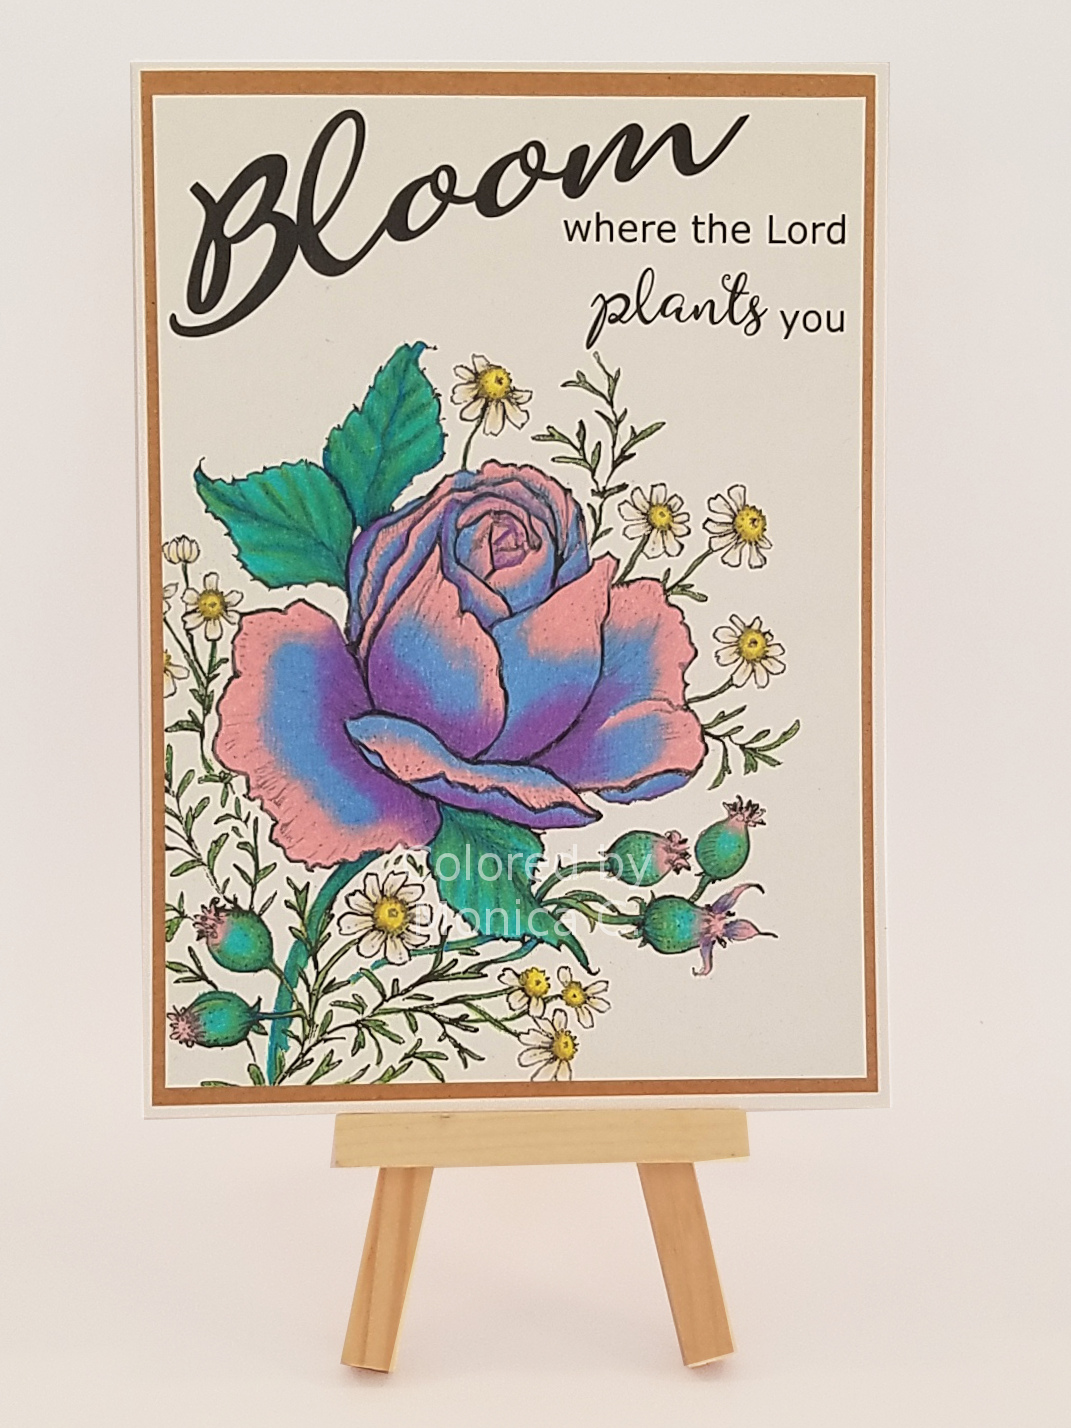
A Tie Dye Rose...
It is time for the Power Poppy Challenge again and this month the challenge is to CASE one of the design team members. CASE stands for Copy And Share Everything. But this challenge was to copy only some things and to change some things too. So I visited the various blogs and where do you even start? There are so many beautiful creations. But one just jumped up and screamed ME!
Allison Cope had created a card with a peony that she had colored in tie dye colors on her blog post entitled POWER POPPY: TIE-DYE BLOOMS.
Since I love roses I opted to use the Rose and Chamomile for my project. I created a sentiment above the rose and printed the whole panel out.
I researched the Distress Oxide inks she had used and matched the colors with my Prismacolor colored pencils. This was part of the copy of this challenge.
The card I created was to be for a congregation member moving to a new job out of state and so I made the card 5x7 to allow a large enough space inside for numerous well wishes and autographs. But I like how she had backed hers with kraft paper and so added a kraft panel between the colored panel and the card base.
I love how this turned out - the color combination gives the rose an almost ethereal quality.
General supplies:
Strathmore Paint Pad watercolor paper
Reflections 110lb heavyweight cardstock for card base
Kraft cardstock for middle panel
Power Poppy Rose and Chamomile digital stamp
Prismacolor pencils
Allison Cope had created a card with a peony that she had colored in tie dye colors on her blog post entitled POWER POPPY: TIE-DYE BLOOMS.
Since I love roses I opted to use the Rose and Chamomile for my project. I created a sentiment above the rose and printed the whole panel out.
I researched the Distress Oxide inks she had used and matched the colors with my Prismacolor colored pencils. This was part of the copy of this challenge.
The card I created was to be for a congregation member moving to a new job out of state and so I made the card 5x7 to allow a large enough space inside for numerous well wishes and autographs. But I like how she had backed hers with kraft paper and so added a kraft panel between the colored panel and the card base.
I love how this turned out - the color combination gives the rose an almost ethereal quality.
General supplies:
Strathmore Paint Pad watercolor paper
Reflections 110lb heavyweight cardstock for card base
Kraft cardstock for middle panel
Power Poppy Rose and Chamomile digital stamp
Prismacolor pencils
Monday, June 26, 2017
Grayscale with a spot of color
I have always been fascinated by photos that are in grayscale, but show off a spot of color. So I decided that I needed to try it out with my pencils.
I used this cute image done by Conie Fong called Bouquet Benny for this technique.
I used French Gray to do the grayscale part of the image as I like the warmer, more sepia looking result that the French Gray colors give. Then I added the bright yellow ribbon to the flower bouquet as my colored focal point.
Using a blended Momento ink frame that I had left over from my Rainbows and Unicorns project, I brought in some more color around the edges before placing the image on a yellow cardbase. I finished the card off with a stamped sentiment and a spot of Wink of Stella on the bow.
General supplies:
Canson XL Drawing paper
Bouquet Benny digital stamp
Prismacolor pencils
Wink of Stella shimmer pen
Momento inks
Stampabilities Everyday Expressions stampset
I used this cute image done by Conie Fong called Bouquet Benny for this technique.
I used French Gray to do the grayscale part of the image as I like the warmer, more sepia looking result that the French Gray colors give. Then I added the bright yellow ribbon to the flower bouquet as my colored focal point.
Using a blended Momento ink frame that I had left over from my Rainbows and Unicorns project, I brought in some more color around the edges before placing the image on a yellow cardbase. I finished the card off with a stamped sentiment and a spot of Wink of Stella on the bow.
General supplies:
Canson XL Drawing paper
Bouquet Benny digital stamp
Prismacolor pencils
Wink of Stella shimmer pen
Momento inks
Stampabilities Everyday Expressions stampset
Sunday, June 25, 2017
Calla Lilies...
I love Calla Lilies, known as Arum Lilies in some parts of the world. Their beautiful elegance is timeless.
The class chosen for the June Kit and Clowder Elements of Nature challenge is the Calla Lily class. Since I had already done that class in the original white, I decided to ask Google for some reference images of Calla Lilies in other colors. I found that the selection was endless and the choice was difficult.
My first one is a multicolored lily that shows off beautifully strong colors of pink, white, yellow and green. I opted to color the image on Kraft as I do love how pencil coloring pops on the natural background.
My second one is an elegant white lily with a dark, rich purple center. Again I colored it on Kraft colored paper to help the colors pop.
I mounted the images onto white cardbases but did not add sentiments that this time. I will do that when I use the card so that I can apply the appropriate wording for the occasion.
General supplies:
Strathmore Toned Tan sketch paper for the colored images
Gina Marie designs stitched rectangle die
Calla Lily digi stamp from Elements of Nature class
White cardbase
Prismacolor pencils
The class chosen for the June Kit and Clowder Elements of Nature challenge is the Calla Lily class. Since I had already done that class in the original white, I decided to ask Google for some reference images of Calla Lilies in other colors. I found that the selection was endless and the choice was difficult.
My first one is a multicolored lily that shows off beautifully strong colors of pink, white, yellow and green. I opted to color the image on Kraft as I do love how pencil coloring pops on the natural background.
My second one is an elegant white lily with a dark, rich purple center. Again I colored it on Kraft colored paper to help the colors pop.
I mounted the images onto white cardbases but did not add sentiments that this time. I will do that when I use the card so that I can apply the appropriate wording for the occasion.
General supplies:
Strathmore Toned Tan sketch paper for the colored images
Gina Marie designs stitched rectangle die
Calla Lily digi stamp from Elements of Nature class
White cardbase
Prismacolor pencils
Friday, June 23, 2017
The bug challenge
I am sure you are wondering - What is a bug challenge??
That is this month's challenge over at Power Poppy. The challenge is to create a card with any sort of a bug on it and so here is my entry.
This card is a showcase of both the things I love doing, coloring and sewing.
The flowers are gerberas from the Kit and Clowder Elements of Nature class. I did them on Kraft paper as I love how pencils pop on Kraft. I cut the image out with a stitched rectangle die and adhered it to a bright yellow cardbase.
I decided to add a butterfly as my bug, but not as a colored image. The butterfly is an embroidered lace embellishment that I made myself. The wings are a mother-of-pearl organza and the stitching is done with Sulky embroidery thread. I adhered it to the card with Glossy Accents so that it will not go anywhere.
The card is completed with a "hello" sentiment that I cut with my Silhouette machine on black cardstock.
I am also entering this card into The Flower Challenge #9 'Anything Goes' challenge.
General supplies:
Strathmore Toned Tan sketch paper for the colored image
Gina Marie designs stitched rectangle die
Glossy Accents
Black cardstock cut with Silhouette for sentiment
Gerbera digi stamp from Elements of Nature class
Cardbase from Paper Studio Simple Basics collection
Organza and embroidery thread
Prismacolor pencils
This card is a showcase of both the things I love doing, coloring and sewing.
The flowers are gerberas from the Kit and Clowder Elements of Nature class. I did them on Kraft paper as I love how pencils pop on Kraft. I cut the image out with a stitched rectangle die and adhered it to a bright yellow cardbase.
I decided to add a butterfly as my bug, but not as a colored image. The butterfly is an embroidered lace embellishment that I made myself. The wings are a mother-of-pearl organza and the stitching is done with Sulky embroidery thread. I adhered it to the card with Glossy Accents so that it will not go anywhere.
The card is completed with a "hello" sentiment that I cut with my Silhouette machine on black cardstock.
I am also entering this card into The Flower Challenge #9 'Anything Goes' challenge.
General supplies:
Strathmore Toned Tan sketch paper for the colored image
Gina Marie designs stitched rectangle die
Glossy Accents
Black cardstock cut with Silhouette for sentiment
Gerbera digi stamp from Elements of Nature class
Cardbase from Paper Studio Simple Basics collection
Organza and embroidery thread
Prismacolor pencils
Subscribe to:
Posts
(
Atom
)