

Showing posts with label House Mouse. Show all posts
Showing posts with label House Mouse. Show all posts
Friday, April 3, 2020
Birthday Oops
Today I am here to show you a House Mouse card that I made. I have not done a make with the mousey friends for ages and so decided it was definitely time. This time I made a belated birthday card for those "oops" moments that seem to happen more often with the increase in a certain number that my ID declares me to have.

Thursday, February 14, 2019
Mice Valentine
Today I have a very traditional Valentine's Day card to share with you - well maybe traditional as far as the colors used are concerned.
The focal image on this card is from the Very Mice Coloring Book Volume 1 and then from the page Berry mice!

Saturday, February 2, 2019
Buttons and bows
Here I am back with another House Mouse project. The current challenge over at the House Mouse Monday Challenge blog is Buttons and/or Bows. I had the perfect stamp for that and I am nearly late!


Monday, January 7, 2019
The importance of being creative
I believe in the importance of doing something creative. Whatever form creativity takes on for you, be sure to take time to do it in 2019. It is an activity that keeps us balanced.
Today I want to share a House Mouse card with you. I have not colored up one of these sweet images for a very long time. I picked up this stamp in a destash sale some time ago and stamped it onto Canson Bristol Vellum paper with Memento Tuxedo Black ink. This was my first try at coloring on new-to-me Bristol Vellum. I was very happy with the results, however I can only use it for physical stamps as my printer won't have anything to do with it.

Saturday, September 1, 2018
Mixed Media Mice
The current challenge at the House Mouse Challenge blog is themed "Use a charm". How fun is that?


I created my card using the Catchin' Some Shade image from the Very Mice Coloring Book. I colored the mice, their towels and the umbrella with my Prismacolor colored pencils. I then did the sand with soft pastels, blending two shades of peach together and then sprayed the panel with a workable fixative.

Once it was dry, I masked off two clouds in the sky and inked the sky by blending Memento Inks. I love the texture one gets from blending the inks on paper with a tooth. I then added a bit of shadowing to the clouds with my pencils as well as coloring the shells and adding some extra depth to spots in the sand. The workable fixative allows for more coloring over the top of it.

Using a stamp from my stash of wood mounted retired Stampin Up stamps, I added the sentiment with Versafine Onyx Black ink and put clear embossing powder on it.

To completed the card, I added the colored panel to a white cardbase and then glued a pewter starfish charm to the sand. While this card is completely one layer (well expect for the charm) it is truly mixed media in that I used pencils, soft pastels and ink to complete it.
General supplies:
Strathmore Paint Pad paper
Catchin' Some Shade image from the Very Mice Coloring Book Vol 1
Reflections 110lb heavyweight cardstock for card base
Krylon Workable Fixative
Prismacolor pencils
Soft pastels
Memento inks
Retired Stampin Up stamp from my stash
Versafine Onyx Black ink
Clear Embossing powder
Pewter starfish charm
Entered into the HMFMC Anything Goes/Optional theme "Add a Charm" Challenge #273
Entered into the QKR Stampede Challenge #311 - Anything Goes
Entered into the Kleuren met Potlooden Everything is Allowed August Challenge
Entered into the Cute N Crafty Anything Goes Challenge #8
Entered into the Crafts Galore Encore Anything Goes Challenge #55
Saturday, August 18, 2018
Happy Mail!
Happy Mail is something we all love. What fun it is to find a handmade card from a crafty friend in the mailbox! Well this is Happy Mail with a difference. My mousey make for this fortnight was inspired by some organizational Youtube videos I was watching while sewing, where pin boards and peg boards were used for inspirational quotes in the organised space.

I used patterned paper for my card panel that resembles a cork board and added a frame cut out of silver metallic cardstock with stitched rectangle dies so that I had a faux stitched line in the center of the frame. I then created 3 little envelopes and inserted a little House Mouse in each one. These are from the stamps I had recently found in the destash sale. I stamped them onto Strathmore Paint Pad paper with Memento Tuxedo Black ink and colored them with my Prismacolor pencils.

I inserted each mouse into a little envelope and glued it onto my pin board. I stamped the happy Mail sentiment onto a small Post-it note and added brads to each item to represent push pins.

I also glued two stickers from my stash onto the pin board. Some additional brads dotted around the board completed the look.

I then mounted the "board" onto a piece of thin craft foam and then onto a top folding cardbase.
General supplies:
Strathmore Paint Pad paper
House Mouse Designs stamps from my stash
Reflections 110lb heavyweight cardstock for card base
Prismacolor pencils
Stitched rectangle dies
Patterned paper
Metallic silver cardstock
Stampabilities Everday Expressions stampset
Concord & 9th Perfectly Penned stampset
Brads and stickers from my stash
Craft foam
Entered into the Fabrika Fantasy Anything Goes Challenge #23
Entered into the QKR Stampede Challenge #309 - Anything Goes
Saturday, August 4, 2018
The Mighty Carolers
It is time for another mousey make and this time a Christmas card. I was able to purchase the wood mounted "Singing Mouse Angels" stamp in a destash sale and what fun it is to color.
I took inspiration from Sue at Sue's Stamping Stuff where she created a scene inside a window. I could not use the traditional window frame as it would cover the mouse in the middle, but I thought this would be a perfect image to create a scene outside of the window and so added curtains to create that look without a window frame.

I stamped the image on Strathmore Paint Pad paper with Memento Tuxedo Black ink and colored it with my Prismacolor colored pencils. I used the tooth of the paper to give some highlight and texture to the pine needles and did the background with a blue soft pastel rubbed into the paper with a cotton wool pad. I sprayed it with a fixative to prevent the pastel from rubbing off.

I created the curtains from patterned paper, free-handing the edges so that they will show all of the mice. The valence is another piece of the paper with the bottom edge cut with a scalloped scissors.

I stamped the sentiment onto the valence with Versamark ink and embossed it with white embossing powder. I added tie-backs of yellow glitter paper and punched some music notes out of black cardstock with a mini punch to complete the scene.
General supplies:
Strathmore Paint Pad paper
Reflections 110lb heavyweight cardstock for card base
Prismacolor pencils
Blue soft pastel
Krylon Workable Fixative
Black, brown and yellow glitter cardsstock
Red patterned paper
Stitched rectangle die
Memento ink
Versamark ink
White embossing powder
Entered into the HMFMC Anything Goes/Optional theme "Christmas in July" Challenge #271
Entered into the Crafts Galore Encore Challenge #54
Entered into the Alphabet Challenge Blog "J is for Jingle Bells"
Entered into the QKR Stampede Challenge #307 - Anything Goes
I took inspiration from Sue at Sue's Stamping Stuff where she created a scene inside a window. I could not use the traditional window frame as it would cover the mouse in the middle, but I thought this would be a perfect image to create a scene outside of the window and so added curtains to create that look without a window frame.

I stamped the image on Strathmore Paint Pad paper with Memento Tuxedo Black ink and colored it with my Prismacolor colored pencils. I used the tooth of the paper to give some highlight and texture to the pine needles and did the background with a blue soft pastel rubbed into the paper with a cotton wool pad. I sprayed it with a fixative to prevent the pastel from rubbing off.

I created the curtains from patterned paper, free-handing the edges so that they will show all of the mice. The valence is another piece of the paper with the bottom edge cut with a scalloped scissors.

I stamped the sentiment onto the valence with Versamark ink and embossed it with white embossing powder. I added tie-backs of yellow glitter paper and punched some music notes out of black cardstock with a mini punch to complete the scene.
General supplies:
Strathmore Paint Pad paper
Reflections 110lb heavyweight cardstock for card base
Prismacolor pencils
Blue soft pastel
Krylon Workable Fixative
Black, brown and yellow glitter cardsstock
Red patterned paper
Stitched rectangle die
Memento ink
Versamark ink
White embossing powder
Entered into the HMFMC Anything Goes/Optional theme "Christmas in July" Challenge #271
Entered into the Crafts Galore Encore Challenge #54
Entered into the Alphabet Challenge Blog "J is for Jingle Bells"
Entered into the QKR Stampede Challenge #307 - Anything Goes
Thursday, July 12, 2018
Hot Summer Days
What better way to cool off in those hot summer days than to sing in the rain and use a peony to attract attention? Here in Florida that would be very possible, it is hot and rains daily.


General supplies:
Reflections 110lb heavyweight cardstock for card base
Master's Touch Watercolor paper
Stampendous Peony Song cling stamp
Yellow and green cardstock
Yellow glitter cardstock
Fantasia watercolor pencils
Patterned paper
Wink of Stella
Tombow Marker
Versafine Onyx Black ink
Clear embossing powder
Entered into the HMFMC Anything Goes/Optional theme "Hot Summer Days" Challenge #270
Entered into the Stempelsonne Anything Goes Challenge #203
Entered into the Kleuren met Potlooden Everything is Allowed July Challenge
Entered into the Simon Says Stamp Summer Fun Monday Challenge
Entered into the Country View In the Summer Garden July Challenge

I had previously purchased a 12 pencil set of Fantasia watercolor pencils at a sale at one of our local crafts stores, but had never had a chance to play with them - until now. I was quite impressed with how well they laid down the color and smoothed out even before adding water. Not like my Prismas though 😉

Having only 12 colors to choose from, made for the need to be a little inventive in the mixing of colors and the playing with the water to create my scene. The stamp is the Stampendous Peony Song cling stamp and I stamped it with Versafine Onyx Black ink on Master's Touch watercolor paper and then added clear embossing powder to protect the lines from the water. Once colored, I created a 5.5x5.5 cardbase and adhered the floral patterned paper on it. I cut the image out with a stitched rectangle frame and added a border around it cut from yellow glitter cardstock.

It definitely is less work to blend the colors together with the watercolor pencils than it is to achieve the same effect with my Prismacolor pencils, but the process is so different I don't think it can be compared. I will play with it again sometime, but for the most part I will stick with my first love.

I added a sentiment from my retired Stampin Up stash stamped on yellow cardstock with Versafine Onyx Black ink and cut it out with a faux stitched label die. I cut the dragonfly from some DSP and added it to the one corner as well as the two green leaf cutouts on the two corners of the glitter frame. I added Wink of Stella to the greenery and the dragonfly's wings and doodled a line around the glittery frame with a Tombow marker.
General supplies:
Reflections 110lb heavyweight cardstock for card base
Master's Touch Watercolor paper
Stampendous Peony Song cling stamp
Yellow and green cardstock
Yellow glitter cardstock
Fantasia watercolor pencils
Patterned paper
Wink of Stella
Tombow Marker
Versafine Onyx Black ink
Clear embossing powder
Entered into the HMFMC Anything Goes/Optional theme "Hot Summer Days" Challenge #270
Entered into the Stempelsonne Anything Goes Challenge #203
Entered into the Kleuren met Potlooden Everything is Allowed July Challenge
Entered into the Simon Says Stamp Summer Fun Monday Challenge
Entered into the Country View In the Summer Garden July Challenge
Wednesday, July 4, 2018
First try at a shadow box card
I recently spent some time on Jennifer McQuire's Youtube channel and came across her tutorial to make a shadow box card. I knew I had to try it and what better theme than this time's House Mouse Challenge?
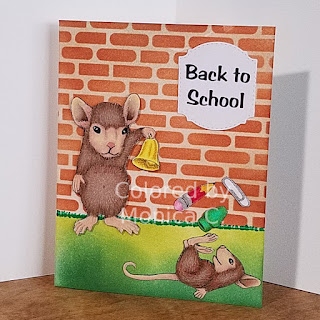


I used two images from the Very Mice Coloring Book to make up the different mousey images that I needed for this project. I colored each image with my Prismacolor pencils, using the coloring guide that I had created for the different mice. Once all the images were colored, I fussy cut them out.

I arranged two on the front of the card with some of the school supply elements included in the image. I inked the front of the card with Memento inks, mini ink blending tools and also used a brick stencil to show the red brick school building. I printed the sentiment out on my computer and cut it with a stitched label die.

The inside or box section of the card has the background inked again with Memento inks and a mini ink blending tool. I placed my colored images into the shadow box at three different levels. One is glued directly onto the background, one is popped up on foam tape and the third one was added directly to the back of the window with the pencil pointing into the sentiment banner.

These cute images are also colored with my Prismacolor colored pencils and were fussy cut out of the coloring book image.

The 3D effect achieved with the shadow box card is so much fun and rather unexpected since it lies flat and fits into an notecard envelope when closed.

General supplies:
Strathmore Paint Pad paper
Reflections 110lb heavyweight cardstock for card base
Prismacolor pencils
White gel pens
Memento inks
Stitched label and oval dies
Entered into the HMFMC Anything Goes/Optional theme "Back to School" challenge #269
Entered into the Stempelsonne Anything Goes Challenge #203
Entered into the Kreative-Tanten Alles Geht challenge #19
Friday, June 1, 2018
Prismacolor Colored Pencil House Mouse Chart
I am pleased to finally share a project with you that I have been working on for some time. I have spent a good deal of time looking for Prismacolor color combo suggestions for the House Mice - is that what they are called when they are all together?
I found a a very useful page for marker colorists on the Stampendous Blog and also great tutorials on the House Mouse Monday Challenge blog, but no chart for Prismacolor pencils. So I created one.

I found a a very useful page for marker colorists on the Stampendous Blog and also great tutorials on the House Mouse Monday Challenge blog, but no chart for Prismacolor pencils. So I created one.

This chart uses the description of each mouse as given by the artist Ellen Jareckie as the basis of the end color of the mouse. The mouse colors extend from reddish-brown to dark grey. Each mouse has their own little mark of identification.
I hope this chart will help other House Mouse fans that like to color in pencils.
You can download a PDF version of the chart to print out here: Prismacolor House Mouse coloring chart
Thursday, May 31, 2018
Gute Bess(e)rung
I recent was fortunate to find a few House Mouse stamps in a destash and so I am back with another card using one of them. A dear friend of mine's father recent underwent surgery and so I wanted to send him a card.


I used alphabet dies to cut and inlay the sentiment, which is missing an E. Space was limited on this card to include it, thus Ms Monica Mouse is pointing it out there, despite me adding the apostrophe.
I colored her with my Prismacolor pencils. The card panel was a first try and blending and spritzing with Distress Oxide ink. I used Vintage Photo here and I love the faux leather look that I got. I cut the card panel with a stitched rectangle die, cut the letters out and a circle with the various dies. I then glued the card panel to the card base.

I fussy cut the mouse and added her into the circle. I cut the letter a second time from bright yellow cardstock and then inlayed them into the relevant cutouts.
General supplies:
Strathmore Paint Pad paper
Reflections 110lb heavyweight cardstock for card base
White and yellow cardstock
Prismacolor pencils
House Mouse stamp
Alphabet, circle and stitched rectangle dies
Memento Tuxedo Black ink
Vintage Photo Distress Oxide ink
Entered into the HMFMC Anything Goes/Optional theme "Use Dies" challenge #267
Entered into the Stempelsonne Anything Goes Challenge #202
Monday, May 21, 2018
A color pop
If you follow my blog, you will know that I am a fan of monochrome images with a pop of color. And this card is just that.


General supplies:
Strathmore Paint Pad paper
Reflections 110lb heavyweight cardstock for card base
Black cardstock
Prismacolor pencils
House Mouse stamp
Rose and sentiment stamps from stash
Memento Tuxedo Black ink
Inkadinkado masking paper
Entered into the HMFMC Anything Goes/Optional theme "Flower Power" challenge #266
Entered into the Power Poppy "Black and White with a Pop of Color" challenge
Entered into the Delicious Doodles May 2018 Flowers challenge
Entered into the Penny Black and More May- Anything Goes challenge
Entered into the Stempelsonne Anything Goes Challenge #202
Entered into the Stampers Swap Shop Buy/Sell/ISO/Share/Swap Facebook group May Masking Challenge

I recently was able to purchase a few House Mouse rubber stamps and this little one is one of them. I stamped the mouse in the middle of a card panel sized at 3.75 x 5 inches. I then masked the upper portion of the mouse so that I could stamp the huge rose she is holding, but that the stem would be visible down her body.
Doing some more masking with the flowers, I stamped 3 roses in the top right and bottom left hand corners and one in the top left and bottom right corners respectively. I then stamped the sentiment to the left of the mouse. All stamping was done in Memento Tuxedo Black ink on Strathmore Paint Pad paper and I used my DIY stamp positioning tool to get the placement correct.

I colored the mouse, corner roses and rose leaves with the Cool Grey color family from my Prismacolor colored pencils. Using a bright orange combo, I applied pencil color to the big single rose that the mouse is holding.

I completed the card by matting the colored panel onto black cardstock which I then in turn adhered to a white cardbase.
General supplies:
Strathmore Paint Pad paper
Reflections 110lb heavyweight cardstock for card base
Black cardstock
Prismacolor pencils
House Mouse stamp
Rose and sentiment stamps from stash
Memento Tuxedo Black ink
Inkadinkado masking paper
Entered into the HMFMC Anything Goes/Optional theme "Flower Power" challenge #266
Entered into the Power Poppy "Black and White with a Pop of Color" challenge
Entered into the Delicious Doodles May 2018 Flowers challenge
Entered into the Penny Black and More May- Anything Goes challenge
Entered into the Stempelsonne Anything Goes Challenge #202
Entered into the Stampers Swap Shop Buy/Sell/ISO/Share/Swap Facebook group May Masking Challenge
Friday, May 11, 2018
Let's be square
Life has been rather busy and I had some custom teddy bears to make, so I was a few days behind on my House Mouse card for the current challenge. The theme is Let's be Square and so what better opportunity than to make a first attempt at a 3D popup box card.

I used the image called Catchin' Some Shade! I colored the image with my Prismacolor colored pencils. But as you can see, those guys forgot their sunscreen. They have red noses and red bellies - not good!

I cut the 3 mice and the umbrella out with my Silhouette Cameo, using the PixScan mat. They cut out very beautifully. I ran a black marker along the cut edge to apply a finishing touch.

I created the box part of the card with my paper trimmer and score board. I adhered decorative panels cut from sand patterned paper and also sponged the edges of the cardstock flaps. The umbrella was added to the longer back panel as part of the backdrop and the 3 mice on the various box inserts to complete the 3D look. The backside of the long part got a lighter colored panel on which I wrote my note to the recipient. I added a sentiment that I stamped in Versafine Onyx Black ink and clear heat embossed to the front flap. I used a label die to cut the sentiment out with.

When folding the card to the side, all the popup elements lie flat. While I have the flaps still down in this photo to show how the inserts go flat, I folded them up to cover the contents before inserting the card into the envelope.

And yes, the 3D popup box card does fit into a standard notecard sized envelope as demonstrated here.

General supplies:
Strathmore Paint Pad paper
Medium and light yellow cardstock
Sand patterned paper
Prismacolor pencils
Stitched label die
Stamp from stash
Versafine Onyx Black ink
Clear embossing powder
Entered into the HMFMC Anything Goes/Optional theme "Let's be Square" challenge #265
Entered into the Lil Patch of Crafty Friends Anything Goes Challenge #81
Entered into the Little Miss Muffet Challenge Anything Goes Challenge #188
Sunday, April 22, 2018
Let's eat...
I was back to browsing in my Very Mice Coloring book for a new image that matched the theme of "Let's Eat" and I do believe that M-ice Cream fits the bill.


General supplies:
Strathmore Paint Pad paper
Reflections 110lb heavyweight cardstock for card base
Prismacolor pencils
Versafine Onyx Black ink
Clear embossing powder
Stamp from my stash
Stitched rectangle die
Entered into the Entered into the HMFMC Anything Goes/Optional theme "Let's Eat" challenge #264
Entered into the Crafting with an Attitude Anything Goes Challenge #38
Entered into the Lil Patch of Crafty Friends Anything Goes Challenge #80

I opted to go with a complete CAS style on this card. It is one layer only. I colored the image with my Prismacolor colored pencils on Strathmore Paint Pad paper and then cut it out with a stitched rectangle die to give a little interest around the edge with the faux stitching.

I stamped a single word sentiment in the top left hand corner with Versafine Onyx Black ink and coated it with clear embossing powder. I thought the crayon look of the sentiment went perfectly with the image.

Writing this post makes me think those mice have a good idea - savoring delicious ice-cream.
General supplies:
Strathmore Paint Pad paper
Reflections 110lb heavyweight cardstock for card base
Prismacolor pencils
Versafine Onyx Black ink
Clear embossing powder
Stamp from my stash
Stitched rectangle die
Entered into the Entered into the HMFMC Anything Goes/Optional theme "Let's Eat" challenge #264
Entered into the Crafting with an Attitude Anything Goes Challenge #38
Entered into the Lil Patch of Crafty Friends Anything Goes Challenge #80
Sunday, April 8, 2018
Sweet friends
Today I have another mousey make to show you.


This image is also from the Very Mice Coloring book and is titled "summer's sweet scent". I have wanted to color this up for a while and since the current House Mouse challenge features multiples, this image of Monica and her furry friend was just perfect.
I printed the image on Canson Mi Tientes paper and colored it using my Prismacolor colored pencils. I had found the plaid patterned paper in my stash and thought it would make the perfect background and so coordinated the pencil colors on the flowers. I also added a few clouds in the background, this was my first attempt at free handing clouds in a background.

I then cut the image out with a stitched oval die and adhered it to the patterned paper which I had, in turn, cut out with a stitched rectangle die.

I added a sweet sentiment from my stash that I had stamped onto yellow cardstock with Vesafine Onyx Black and heat embossed with clear embossing powder. Using a stitched circle die, I cut the sentiment out and popped it up with foam tape. I also added a green leaf sprig die cut.
General supplies:
Canson Mi Tientes paper
Reflections 110lb heavyweight cardstock for card base
Patterned paper from stash
Yellow and light green cardstock
Versafine Onyx Black ink
Prismacolor pencils
Stitched rectangle, oval and circle dies
Leaf spring die
Sentiemnt stamp from stash
Clear embossing powder
Entered into the HMFMC Anything Goes/Optional theme "Multiple Images" challenge #263
Entered into the QKR Stampede Challenge #290 Anything Goes
Thursday, March 29, 2018
Ribbon and bows
Christmas always seems to creep up at top speed and so I decided to try and be ahead of the curve and so here is my first Christmas card for 2018.

I have used the mouse from the Berry Mice image from my A Very Mice Coloring Book. I colored her, yes her as her name is also Monica, with my Prismacolor Colored pencils on Canson Mi Tientes sand paper and then fussy cut her out.

I cut the gift that she is carrying out of Christmas patterned paper with a stitched hexagon die and applied the ribbon and bow with golden satin ribbon.
The top right hand corner is embellished with a flourish die cut done from DCWV metallic washi tape paper and I added the sentiment in the middle. The sentiment is white heat embossed on black cardstock and then cut out with a stitched circle die.

I created my scene on a card panel just slightly smaller than a regular A2 sized card which I embossed with a Darice snowflake embossing folder. I then adhered the card panel onto a cardbase to complete the card.
General supplies:
Canson Mi Tientes sand colored paper
White and black cardstock
DCWV Metallic Washi Tape paper
Berry Mice House Mouse image
Sentiment stamp from stash
Prismacolor pencils
Stitched hexagon and circle dies
Flourish die
Darice Snowflake embossing folder
Versamark ink
White embossing powder
Entered into the HMFMC Anything Goes/Optional theme "Ribbons or Bows" challenge #262
Entered into the Stempelsonne Anything Goes Challenge #200
Entered into the Cardz 4 Galz Buttons and/or Bows Challenge #68

I have used the mouse from the Berry Mice image from my A Very Mice Coloring Book. I colored her, yes her as her name is also Monica, with my Prismacolor Colored pencils on Canson Mi Tientes sand paper and then fussy cut her out.

I cut the gift that she is carrying out of Christmas patterned paper with a stitched hexagon die and applied the ribbon and bow with golden satin ribbon.
The top right hand corner is embellished with a flourish die cut done from DCWV metallic washi tape paper and I added the sentiment in the middle. The sentiment is white heat embossed on black cardstock and then cut out with a stitched circle die.

I created my scene on a card panel just slightly smaller than a regular A2 sized card which I embossed with a Darice snowflake embossing folder. I then adhered the card panel onto a cardbase to complete the card.
General supplies:
Canson Mi Tientes sand colored paper
White and black cardstock
DCWV Metallic Washi Tape paper
Berry Mice House Mouse image
Sentiment stamp from stash
Prismacolor pencils
Stitched hexagon and circle dies
Flourish die
Darice Snowflake embossing folder
Versamark ink
White embossing powder
Entered into the HMFMC Anything Goes/Optional theme "Ribbons or Bows" challenge #262
Entered into the Stempelsonne Anything Goes Challenge #200
Entered into the Cardz 4 Galz Buttons and/or Bows Challenge #68
Monday, March 12, 2018
House mouse and a bunny
It is time for another House Mouse challenge and this time the optional theme is Bunnies. Since none of my House Mouse images have a bunny in them, I did some masking and stamping.
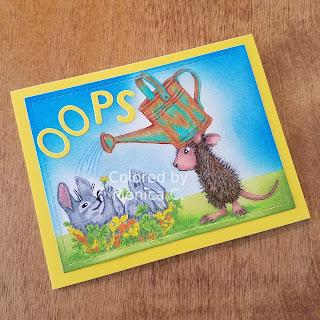
I used the sweet image from my Very Mice Coloring book called Keeping Cool. I stamped the bunny with a stamp from my stash and then colored both images with my Prismacolor pencils, adding white gel pen highlights on the eyes. I cut the panel out with a stitched rectangle die.
Using a Post It note, I then masked the horizon line and inked the background with Memento Inks. leaving a "glow" around the critters.

Since the bunny is in for an accidental shower (that can happen when bunnies lie in the flower bed) I thought the card lent itself perfectly to become a belated birthday card.
I cut the letters O-O-P-S out of yellow cardstock and glued them to the front panel which I then matted onto a piece of the same yellow cardstock and applied the panel to the card base.

The card was completed with an appropriate sentiment stamped on the inside.

General supplies:
Strathmore Paint Pad paper
Reflections 110lb heavyweight cardstock for card base
Yellow cardstock
Keeping Cool House Mouse image
Bunny and Sentiment stamps from stash
Prismacolor pencils
Stitched rectangle dies
Alphabet dies
Memento inks
Mini blending tool
Entered into the HMFMC ANYTHING GOES with the option of Bunnies challenge #261

I used the sweet image from my Very Mice Coloring book called Keeping Cool. I stamped the bunny with a stamp from my stash and then colored both images with my Prismacolor pencils, adding white gel pen highlights on the eyes. I cut the panel out with a stitched rectangle die.
Using a Post It note, I then masked the horizon line and inked the background with Memento Inks. leaving a "glow" around the critters.

Since the bunny is in for an accidental shower (that can happen when bunnies lie in the flower bed) I thought the card lent itself perfectly to become a belated birthday card.
I cut the letters O-O-P-S out of yellow cardstock and glued them to the front panel which I then matted onto a piece of the same yellow cardstock and applied the panel to the card base.

The card was completed with an appropriate sentiment stamped on the inside.

General supplies:
Strathmore Paint Pad paper
Reflections 110lb heavyweight cardstock for card base
Yellow cardstock
Keeping Cool House Mouse image
Bunny and Sentiment stamps from stash
Prismacolor pencils
Stitched rectangle dies
Alphabet dies
Memento inks
Mini blending tool
Entered into the HMFMC ANYTHING GOES with the option of Bunnies challenge #261
Subscribe to:
Posts
(
Atom
)
