Thursday, July 12, 2018

Hot Summer Days

What better way to cool off in those hot summer days than to sing in the rain and use a peony to attract attention? Here in Florida that would be very possible, it is hot and rains daily.


I had previously purchased a 12 pencil set of Fantasia watercolor pencils at a sale at one of our local crafts stores, but had never had a chance to play with them - until now. I was quite impressed with how well they laid down the color and smoothed out even before adding water. Not like my Prismas though 😉


Having only 12 colors to choose from, made for the need to be a little inventive in the mixing of colors and the playing with the water to create my scene. The stamp is the Stampendous Peony Song cling stamp and I stamped it with Versafine Onyx Black ink on Master's Touch watercolor paper and then added clear embossing powder to protect the lines from the water. Once colored, I created a 5.5x5.5 cardbase and adhered the floral patterned paper on it. I cut the image out with a stitched rectangle frame and added a border around it cut from yellow glitter cardstock.


It definitely is less work to blend the colors together with the watercolor pencils than it is to achieve the same effect with my Prismacolor pencils, but the process is so different I don't think it can be compared. I will play with it again sometime, but for the most part I will stick with my first love.


I added a sentiment from my retired Stampin Up stash stamped on yellow cardstock with Versafine Onyx Black ink and cut it out with a faux stitched label die. I cut the dragonfly from some DSP and added it to the one corner as well as the two green leaf cutouts on the two corners of the glitter frame. I added Wink of Stella to the greenery and the dragonfly's wings and doodled a line around the glittery frame with a Tombow marker.

General supplies:
Reflections 110lb heavyweight cardstock for card base
Master's Touch Watercolor paper
Stampendous Peony Song cling stamp
Yellow and green cardstock
Yellow glitter cardstock
Fantasia watercolor pencils
Patterned paper
Wink of Stella
Tombow Marker
Versafine Onyx Black ink
Clear embossing powder

Entered into the HMFMC Anything Goes/Optional theme "Hot Summer Days" Challenge #270
Entered into the Stempelsonne Anything Goes Challenge #203
Entered into the Kleuren met Potlooden Everything is Allowed July Challenge
Entered into the Simon Says Stamp Summer Fun Monday Challenge
Entered into the Country View In the Summer Garden July Challenge

Monday, July 9, 2018

Faux Stained Glass

Another inspiration from Jennifer McQuire's YouTube channel. I loved the beautiful faux stained glass elements that she created and so decided to make one myself. I used this butterfly die from my stash and cut it out 4 times from white cardstock and one time from black cardstock. I traced the outline shape and fussy cut the base. I then used my Prismacolor colored pencils to add the gradient color onto the base.


I glued the 4 layers of die cuts onto the base and filled each space with Glossy Accents. I set it aside to dry. I applied Bridal Tinsel embossing powder to the black cardstock to achieve this beautiful, glossy pewter looking die cut which I then glued to the top of my stack when the Glossy Accents was dry.


Using my Silhouette Cameo, I typed out Happy Birthday and created a shadow - which I cut out 4 times in the lighter purple cardstock. I glued the 4 shadow pieces together and then added the lettering that I had cut out in a darker purple cardstock.


I ran a light purple cardpanel through my Texture Boutique using a Darice embossing folder and then adhered the two die cut elements to the front of the card. I will be trying this Faux Stained Glass technique again.

General supplies:
Reflections 110lb heavyweight cardstock for card base
Light purple, medium purple, dark purple, white and black cardstock
Prismacolor pencils
Butterfly die from stash
Glossy Accents
Darice embossing folder
Bridal Tinsel embossing powder 


Thursday, July 5, 2018

Peony Delight

Today I have another project using a Conie Fong Art image to show you. I was lucky enough to win a prize in the May Facebook Group challenge and this was my choice. The image is called Peony Delight.


I printed the image onto Strathmore Toned Tan paper and colored it with my Prismacolor colored pencils. I started with the yellow flower, but while doing so a friend came to mind who could use a little uplifting at this time and her favorite color is pink. So the second flower became pink and so did the rest of the card.

I placed the colored image on my Pixscan mat and had my Silhouette Cameo scan the outline. I then added an offset to the cut line and replaced the image paper with my plain cardpanel and cut out the shape. I then replaced the panel again with a piece of craftfoam and cut the shape out of it. I then glued the craftfoam behind the cardpanel and then glued both over the tan paper, framing the peonies.


I added an encouraging scripture to the top right corner of the cardpanel which I stamped in Versamark ink and heat embossed in white.


The card is already in the mail. I sure hope the card will do what it is meant to do when it arrives.

General supplies:
Strathmore Toned Tan paper
Reflections 110lb heavyweight cardstock for card base
Pink cardstock
Pink Craftfoam
Retired Stampin up sentiment stamp
Versamark ink
White embossing poweder
Prismacolor pencils

Entered into the Conie Fong Art & Design Facebook Group July project challenge
Entered into the Stempelsonne Anything Goes Challenge #203
Entered into the Little Miss Muffet Challenge Anything Goes Challenge #192
Entered into the Lil Patch of Crafty Friends Anything Goes Challenge #85
Entered into the Word Art Wednesday Anything Goes Challenge #342 - #343


Ellie and her bouquet

It is time for another challenge over at Crafting with an Attitude and this month's challenge is "Just for fun".

With the freedom to choose any image for my DT project, I dove into my stash of Conie Fong Art images and colored up this sweet elephant. The image is called Ellie with Bouquet.


As always, I used my Prismacolor pencils. But since I was travelling, I had taken only the 48 set with me and so challenged myself to color in the image with a limited palette. The flower coloring was inspired by a beautiful flower a dear friend had in a vase on her table. It was pink with purple edges.


I then cut the image out with a stitched rectangle die, leaving white space at the bottom for a sentiment I had cut out on my Silhouette machine of black cardstock. I applied the panel to a pink cardbase and then glued the sentiment in place.


I hope you like this clean and simple card with the sweet elephant on it. I love cards with a hello sentiment on them. They are so versatile and can be sent for any occasion.

General supplies:
Strathmore Paint Pad paper
Cardbase from Paper Studio Simple Basics collection
Prismacolor pencils
Black cardstock
Stitched rectangle die

Entered into the Conie Fong Art & Design Facebook Group July project challenge
Entered into the Dragonfly Dreams Summer challenge
Entered into the Aud Sentiments Flowers + A Sentiment Challenge #207

Wednesday, July 4, 2018

First try at a shadow box card

I recently spent some time on Jennifer McQuire's Youtube channel and came across her tutorial to make a shadow box card. I knew I had to try it and what better theme than this time's House Mouse Challenge?


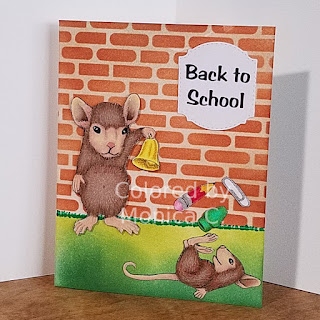
I used two images from the Very Mice Coloring Book to make up the different mousey images that I needed for this project. I colored each image with my Prismacolor pencils, using the coloring guide that I had created for the different mice. Once all the images were colored, I fussy cut them out.


I arranged two on the front of the card with some of the school supply elements included in the image. I inked the front of the card with Memento inks, mini ink blending tools and also used a brick stencil to show the red brick school building. I printed the sentiment out on my computer and cut it with a stitched label die.


The inside or box section of the card has the background inked again with Memento inks and a mini ink blending tool. I placed my colored images into the shadow box at three different levels. One is glued directly onto the background, one is popped up on foam tape and the third one was added directly to the back of the window with the pencil pointing into the sentiment banner.


These cute images are also colored with my Prismacolor colored pencils and were fussy cut out of the coloring book image.


The 3D effect achieved with the shadow box card is so much fun and rather unexpected since it lies flat and fits into an notecard envelope when closed.


General supplies:
Strathmore Paint Pad paper
Reflections 110lb heavyweight cardstock for card base
Prismacolor pencils
White gel pens
Memento inks
Stitched label and oval dies


Back to Top