Thursday, February 22, 2018

One Mouse Band

Although we have Summer all year round here in Florida, I know that many of my friends in the northern climes are looking for Spring. This brightly colored card using the House Mouse stamp "One Mouse Band" is for them.


I colored the image on Strathmore Paint Pad paper with my Prismacolor colored pencils and then cut it out with a stitched hexagon die. I backed the image on a lilac circle.


I then cut a card panel of bright yellow cardstock with my stitched rectangle die which I then embossed with a Darice embossing folder. I laid a strip of dark purple cardstock across the bottom section and adhered the focal image to the right side of the cardpanel and added a die cut sentiment to the top left hand corner.


I traced Glossy Accents over the sentiment to give it shine and dimension.

General supplies:
Strathmore Paint Pad paper
Reflections 110lb heavyweight cardstock for card base
Yellow, lilac and purple cardstock
One Mouse Band House Mouse image
Prismacolor pencils
Stitched rectangle, circle and hexagon dies
Thank You word die
Darice embossing folder.

Entered into the HMFMC ANYTHING GOES with the option of SPRING COLORS challenge #260
Entered into Stamp ink Paper Challenge 138 – Card Maker’s Choice!
Entered into the Little Miss Muffet Anything Goes Challenge #183

Sunday, February 18, 2018

Coloring on vellum

Today I have a card to show you with a technique that I have been wanting to try for ages - coloring on vellum.

The focal image on my card is the beautiful Flowers in a Vase digital stamp by Conie Fong. I colored the image on Strathmore Toned Tan paper with my Prismacolor colored pencils and cut it out with my Silhouette Cameo. I added some details with a white gel pen.


To make the card panel, I stamped a row of butterflies up the side of a top folding card with Versamark ink and then embossed them with white embossing powder. Using my Prismacolor pencils in the same red and purple shades, I colored the butterflies on the back of the vellum. The looked really light until I put the vellum piece on the white card base. That made them show up nicely.


I adhered the focal image to the left on the card, added a "hello" sentiment and a few light purple jewels.

I love the soft look of the pencil behind the vellum and will definitely be trying this again.

General supplies:
Strathmore Toned Tan paper
Vellum
Reflections 110lb heavyweight cardstock for card base
Purple cardstock
Retired Stampin up butterfly stamp
Versamark ink
White embossing poweder
Prismacolor pencils
Sentiment die
Purple jewels


Sparkly hearts

I recently got a new die in the mail and it just inspired me to try it out. Since it is still February, the month of love, it was just perfect.


My card incorporates the die and one of my favorite teddy stamps.

I cut the heart cluster out of red glitter cardstock. I mean if we are going to go with so many hearts, they do need to shine, don't they? I also cut the "with love" sentiment out of the same red glitter cardstock.

My focal image is the clear stamp from Wild Rose Studio called Raining Roses. I colored the image with my Prismacolor Colored pencils and fussy cut it out (this time with my scissors).

I adhered the heart frame directly onto the card base and then adhered the teddies over the top.


I cut the sentiment into three parts, using the flourish as a ground for the bears and putting the two words underneath each other in the top right hand corner. I glued three hearts back into the frame with a large blob of glue without pressing them down into it. That way when the glue dies, it will give those hearts a little dimension, but not as much as foam squares. I scattered a few more of the hearts down around the teddies.

This CAS card is nice and flat and will go through the  mail really well.

General supplies:
Strathmore Paint Pad paper
Reflections 110lb heavyweight cardstock for card base
Red glitter cardstock
Wild Rose Studio Raining Roses clear stamp
Memento Tuxedo black ink
Prismacolor pencils
Clustered heart and sentiment dies

Entered into the Stempelsonne Anything Goes Challenge #199
Entered into the Fabrika Fantasy Challenge #17 - LOVE
Entered into the Addicted to Stamps and More CAS Challenge #279 
Entered into the Cardz 4 Galz Stamping (No Digis) Challenge #65

Monday, February 12, 2018

Owl say hello

Today I am back with another card made from a Kit and Clowder All About Animals class practice.


This is the owl lesson. Although I have been a member of the Animals class for a while, I found it rather intimidating as everything was aimed at markers and what do I know about Copics?? But recently Alyce provided conversion charts for markers to pencils and vice versa and so now I could figure out what I was doing with my Prismacolor colored pencils. I completed the owl lesson, one I had printed the digi out for a long time ago.

I cut the image out with an oval stitched die and adhered it to a black card panel which I had embossed the one edge of.

A simple Hello sentiment cut out of textured metallic cardstock was added.

I wanted to keep the card simple so that owl would remain the focal point.

General supplies:
Canson XL Drawing paper
Reflections 110lb heavyweight cardstock for card base
Owl digi stamp from the course
Black cardstock
Word die
Stitched oval die
Darice edge embossing folder
Prismacolor pencils

Entered into the Stempelsonne Anything Goes Challenge #198
Entered into the Crafting From the Heart Anything Goes Challenge #194

Wednesday, February 7, 2018

The cat is out the bag...

... or is it the mouse out the jar?

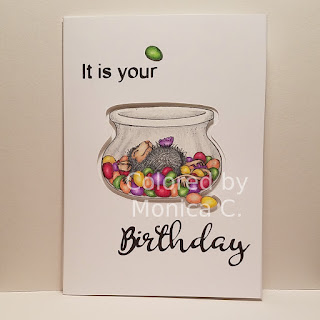
I know someone who just loves jelly beans. So when I saw the Stampabilities Sweet Sensation stamp in a destash, I knew it had to come home to me. A birthday was eminent and this was the perfect focal point. And anyway, who does not love House Mouse designs??

I recently saw a video on my YouTube feed by Jennifer McQuire making a "in-and-out" card. I decided that I wanted to try it with this card. I went for a 5x7 sized side folding card and adapted her instructions accordingly.

I stamped the image with Momento Tuxedo Black ink on Strathmore Paint Pad paper. I also stamped some additional single jelly beans and then colored the whole image with my Prismacolor colored pencils.


Then using the PixScan mat with my Silhouette Cameo, I cut the image out. Using the trace line from that image, I created another cut line offset slightly from the first one and cut that out of the front of one of the card bases.

Pulling out my pen holder, I used the Silhouette Cameo to write my sentiment on the outside of the one card and on the flap of the second card with a black gel pen. I then colored the letters with the same gel pen and adhered the two sections of the card together.

I then adhered the image onto the flap of the second section with foam tape so that it would be raised enough to peek through the hole cut into the first flap.


I added the additional single jelly beans that I had colored and cut out to the second flap of the card.


The last section got a sentiment and then my personal note added.


I so enjoyed making this card. The "perfectness" (is that even a word?) of the image together with the fun of the construction only fueled the excitement of giving it to the recipient.

General supplies:
Strathmore Paint Pad paper
Reflections 110lb heavyweight cardstock for card base
Stampabilities Sweet Sensation wood mounted stamp 
Memento Tuxedo black ink
Prismacolor pencils
Silhouette Cameo with PixScan mat and pen holder
Black gel pen
Foam tape
Retired Stampin Up sentiment stamps


Back to Top